
Recently I endeavored to finally set up my own home recording studio. For nearly 12 years, I have worked in Los Angeles as a session guitarist, recording guitars on literally hundreds of songs for my own bands and for other artists, but without ever recording anything at my own home. Every time a request came in for a remote guitar session, I would call up a friend who is an engineer and pay him his hourly rate out of my own rate to help me deliver the session. Over the years I developed the skills for tracking guitars, knowing how to create parts, get sounds, and play with and around a click. But...I never developed the engineering skills associated with recording. Within the last few months, my ability to meet with engineers has been severely limited, and as a result, it became apparent that I would need to get things set up at home and learn fast to meet my commitments.
As with anything I endeavor to do outside of my comfort zone, I sought out the advice of professionals, mainly recording engineers and other guitarists known for doing a lot of work at their own home studio. I took their suggestions and started researching to come up with solutions that fit within my budget. Knowing that many of our students are curious about recording and setting up their own home studio, I thought it would be fun to share my adventure.
When assembling a home recording studio, there are a few core pieces that every musician needs. These items are described below. Altogether, I was able to set up a home studio that allows me to deliver professional-quality guitar sessions for under $500.
Digital Audio Workstation (DAW)
DAW is our recording software. Some of the most popular softwares are Logic, Pro Tools, Ableton Live, Fruity Loops, Cubase, Digital Performer, and Reason. In truth, there are more than I could possibly list. The two that are considered industry standard are Logic (Apple) and Pro Tools (Avid). Right now as I write this article, Apple is offering Logic Pro for free for 90 days. This offer includes the full version of Logic with all plugins (sounds). I myself chose Logic after going back and forth with Pro Tools. I found Logic to be more intuitive for what I needed and ultimately more affordable. Even without the current offer, Logic is only $200, and Pro Tools is a subscription-based software. If you are not a Mac user, Pro Tools is your best option.
With any of these DAWS, you will need some serious space on your computer hard drive. If you are a Mac user, I recommend downloading Clean My Mac and running it to clear out space. This program will make your computer run like it’s brand new.
Digital Audio Interface
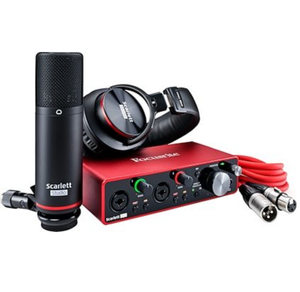
The digital audio interface is what you plug your microphone or instrument cable into. This is the machine that captures your audio and translates it to the computer. Like the DAWs, there are countless options when it comes to interfaces. I choose to go with the Scarlett 212 Studio Bundle. This includes a decent condenser microphone, XLR cable, over-ear headphones, and the Scarlett 212 interface for one very reasonable price.
Over-Ear Headphones
Over-ear headphones are a very important item. We need to make sure that our reference audio, whether it be other tracks we’re working with, a click track, or even just the sound of our own instrument, are isolated so they don’t bleed into our microphone. For me, I often need to record acoustic guitars. If the audio was not isolated in my headphones, it would end up on my track. The term "bleed" basically means that we’re hearing things on our track beyond what was intended.
Condenser Microphone
A condenser microphone is the most versatile microphone for recording. This microphone can be used to record pretty much any instrument, as well as your voice. The bundle I recommended above includes a fairly inexpensive, but high-quality microphone. I have been using that microphone to record my acoustics, and it sounds fantastic to me. But, mind you, I have been in this part of the game for all of a few weeks. For audiophiles, especially professional recording engineers, the sky is the limit on quality, and these microphones can get very expensive. Along with this microphone, I would suggest purchasing a “pop filter” and either a boom mic stand or desk mount mic stand.

Midi Controller
A midi control is a keyboard. It is how we record our software instruments, which could be any kind of piano. It could also be bass, drums, strings, etc. I chose to go with the Akai MPK mini midi controller, at only $60 (renewed) on Amazon. It's a two-octave controller that also has drum pads, an arpeggiator, and many other fun bells and whistles. With the smaller midi controllers, you can change the octave of the keyboard to hear the full range of a piano. However, this may not be ideal for anyone wanting to actually play parts with two hands for their recordings. In this case, I would suggest getting a larger scale controller as well as a sustain pedal.

Studio Monitors
Studio Monitors are basically computer speakers with the purpose of providing a clear audio profile of the music being played. Just like the condenser microphone, studio monitors can range widely in price. I choose to go with Presonus Eris E3.5. At just $99, these little near field monitors provide excellent sound. If I could go back, I would upgrade to the bluetooth version for an additional $30. This feature has nothing to do with recording, but it would allow me to play the music from my iPhone when I don’t have a dongle handy. Be sure to include two short balanced ¼-inch cables. These do not come with the monitors unless specified. They are necessary to connect the studio monitors to the audio interface.
Getting Your Music Online
It just so happens that while I was putting my studio together, I was also working on getting my original band's music back online. After talking with friends who are songwriters and producers, I decided to go with Distrokid. Their platform is far less expensive than the competition, and the platform is effortless to use. I know many of our students are hoping to share their music online, and this is the easiest way to do it. For $20 a year, they can upload unlimited music, and Distrokid will deliver it right to Apply Music, Spotify, Amazon Music, etc. Not only that, but they deliver 100% of the profits right back to the user.
A Home Studio Checklist:
- DAW (Logic, Pro Tools, Fruity Loops, Etc.)
- 1 Digital Audio Interface
- 1 ¼-Inch Instrument Cable
- 1 Condenser Microphone
- 1 Pop Filter
- 1 XLR Cable
- 1 Mic Stand
- 1 Midi Control
- 1 USB Connector
- 2 Studio Monitors (Left, Right)
- 2 Balanced ¼-Inch TRS Cables (Less than 6 feet in length)
- 1 External Hard Drive (Highly Recommended)
Additional Recording Resources:
How To Record Electronic Drums
Creating A Studio Room For Beginners